.png "Jonathan DeVore")
FullStory is an amazing application that helps developers and designers "fine-tune the customer experience." And from the looks of it, Fullstory uses Zendesk Help Center to manage its knowledge base.
And it looks really great!
But, while reviewing their help documentation, I noticed several articles that could (IMHO) be clearer if they were workflow articles. This blog post will walk through how I (if FullStory ever asked me to) would make over the article by using the ScreenSteps workflow article.
The Article As it Currently Stands
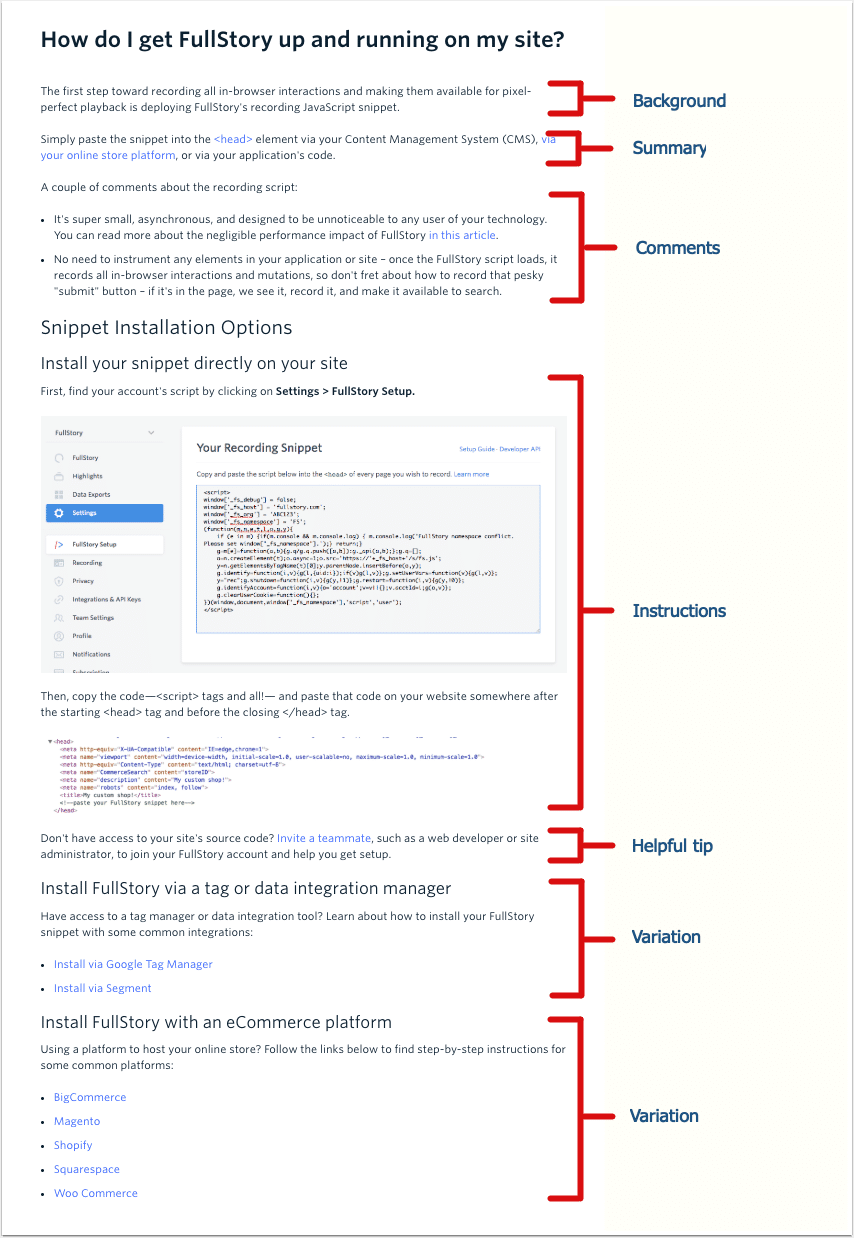
The help article is called "How do I get FullStory up and running on my site?" As you can see in the screenshot below, it starts off with some background information, a summary of what will happen, some comments, instructions, a helpful tip, and then variations if your situation is unique.
What's wrong with it?
First of all, given the options available in the Zendesk Help Center, the author of the article above did a great job. There aren't a lot of formatting options in Zendesk.
Second, the only way to know if anything truly is wrong with the article is to find out how many tickets are submitted from customers asking how to get FullStory up and running. Since I don't have that data, I can't say for sure that anything truly is wrong with it.
But I can say this – with the ScreenSteps Workflow Article, we will be able to make some improvements to readability. And this example gives us a great opportunity to walk through how you could improve your existing articles using the workflow article.
So, let's do our makeover!
Step 1: Find out the first question
The first question in the workflow article is really important. It prevents the reader from wasting time going through a bunch of instructions that aren't applicable.
In this article, it seems that the first question comes from that helpful tip in the original article: "Do you have access to your site's source code?" That bit is actually after the main instructions, but it's important enough that it should kick off the workflow.

If the answer is "No" then there's no need to continue with the instructions. In that case, the reader would need to invite a team member and give them instructions.
Note: I'm not an expert on FullStory. So if some of my assumptions are wrong, sorry. But this example is still a helpful exercise to teach you how to take existing articles and improve them with a workflow article.
If the answer is "Yes" then we continue down that path with some follow-up questions.
Step 2: Which questions direct the reader to the right spot
The next questions are directing the reader to the applicable instructions for their situation. In the original article, the variations were included at the bottom; however, those variations seem kind of important. If one of the variations apply, then it seems that would impact what the reader needs to do. So I bumped those questions to the top so we can direct the reader to the right set of instructions.

If the answer is "Yes" then we suggest instructions for setting up an eCommerce platform...

But if the answer is "No" then there's no need to show those options. So we continue on down another path and ask another question to help direct the reader to the right spot...

Again, the purpose here is to direct the reader to the right set of instructions. If they answer "Yes" we include links to other resources. If the answer is "No" then we include the simple instructions.
Step 3: Include step-by-step instructions
In other decision tree applications, it's not nearly as easy to include step-by-step instructions in the actual article. But with ScreenSteps, it's a piece of cake. So we don't have to always link out to other articles – with ScreenSteps, we can include the details right here.

Those instructions are very clear and the reader doesn't have to leave the article to see them.
Step 4: Break up lengthy instructions
In this article, I decided to chunk the step-by-step instructions so that the reader doesn't skip past any important details. The first step is "Copy Your FullStory Snippet" and the second step is to "Paste snippet after <head> tag."

Step 5: Add any additional instructions that apply to any of the paths
At the end of the article, I added the comments section. I did this in a way so that no matter which path the reader takes, they all have to read this snippet. I could have added this in the beginning (and that may have been a better spot), but I opted to add it in the end because it might make more sense to the reader after the work has been accomplished.

That's it! You can see how easy it is to take the exact same content from the original article and with upgrade it using the Workflow Article. We turned sections that talked about variations and helpful tips, and turned them into questions that direct the reader to the correct set of instructions right away. We then included step-by-step instructions right within the article so the reader doesn't have to navigate away and potentially get lost.
Give it a try!
You can go through the workflow article right here!
And here's the best news for FullStory – if they wanted to, they could use ScreenSteps workflows with Zendesk. So they wouldn't need to leave what they currently have. They would just need to use the Zendesk integration and workflow articles would publish right to their Zendesk Help Center.
If you want to try workflow articles, request a free trial of ScreenSteps! Or, if you are already a ScreenSteps customer, contact support to see if you have the workflows option on your account!